Dansk udgave
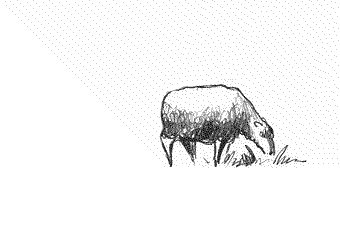
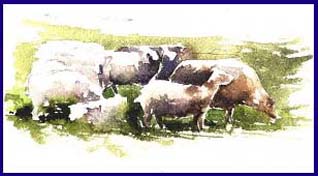
I first started drawing sheep when I taught on a course on the Faroe Islands in 1994. I discovered a system which when I tried it out on my pupils, got them to draw reasonable "sheep" without too much trouble and they, of course, got better with practice.
With this very simple system, you will learn to draw a single sheep and you can also use it to draw a whole flock.
First , let us ignore the different breeds of sheep and concentrate on a typical 'grass muncher' in a typical position, standing sideways with its head turned towards the onlooker.
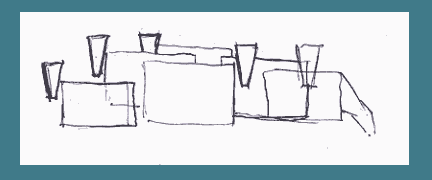
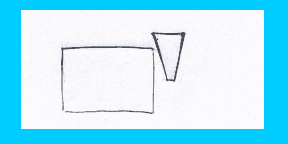 You start by drawing an
oblong and a triangle.
You start by drawing an
oblong and a triangle.
Now that is simple! You don't need to use a
ruler!
The only problem here is that the proportions between the oblong
(body) and the triangle (head) have to be correct. And that has to be found by
'trial and error'. The two geometric forms should be drawn faintly with a
pencil, they are only a help for what comes next.
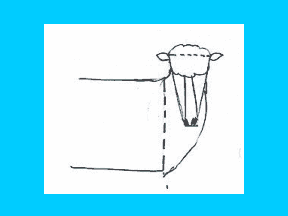
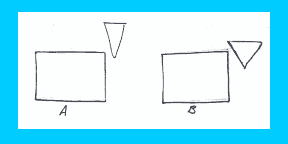 A common mistake is to draw
the triangle too high, as in fig. A, which is a good starting point for a horse
or a lama, or to draw the triangle too wide, as in B, which will give you a nice
'bull'.
A common mistake is to draw
the triangle too high, as in fig. A, which is a good starting point for a horse
or a lama, or to draw the triangle too wide, as in B, which will give you a nice
'bull'.
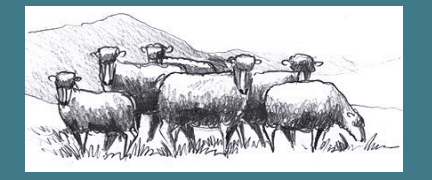
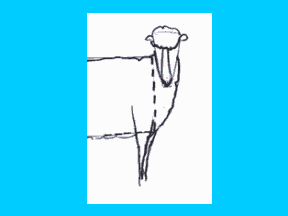
 When you've
drawn the 'oblong' and 'triangle' then you have to make the triangle into the
sheeps head. You add the curley hair on top of the head and the curley fringe
over the eyes. Don't bother with the eyes! The nose is long and broad, but don't
join the bridge of the nose to a point under the fringe! The nostrils and mouth
are at the bottom of the face. The neck starts around the side of the face
and joins the body at the lower corner of the 'oblong', and don't forget the two
small ears!
When you've
drawn the 'oblong' and 'triangle' then you have to make the triangle into the
sheeps head. You add the curley hair on top of the head and the curley fringe
over the eyes. Don't bother with the eyes! The nose is long and broad, but don't
join the bridge of the nose to a point under the fringe! The nostrils and mouth
are at the bottom of the face. The neck starts around the side of the face
and joins the body at the lower corner of the 'oblong', and don't forget the two
small ears!
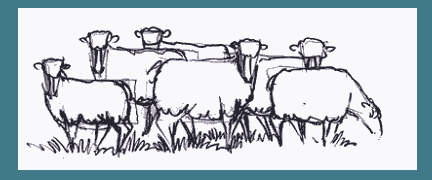
 Now we can begin
working with the back end of our sheep. The back end of the sheep can be as
round as you want to make it, the important thing being that the hind leg starts
from the lower left hand corner of the 'oblong'. The far side leg is mostly
hidden by the belly of the sheep but I've indicated it's form, (with a dotted
line), in illustration (b).
Now we can begin
working with the back end of our sheep. The back end of the sheep can be as
round as you want to make it, the important thing being that the hind leg starts
from the lower left hand corner of the 'oblong'. The far side leg is mostly
hidden by the belly of the sheep but I've indicated it's form, (with a dotted
line), in illustration (b).
 The front legs are
placed around the lower right hand corner of the 'oblong'. The closer leg starts
quite broad in the body of the sheep and tapers down. The far leg is shown
behind the front leg as a narrow leg.
The front legs are
placed around the lower right hand corner of the 'oblong'. The closer leg starts
quite broad in the body of the sheep and tapers down. The far leg is shown
behind the front leg as a narrow leg.
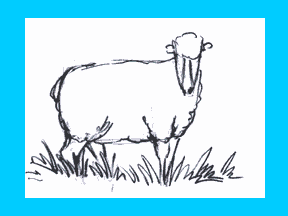 If
you have trouble with the legs, then hide the legs in high grass!
If
you have trouble with the legs, then hide the legs in high grass!
 The last thing to do is to give the sheep some shading. Our sheep is
clean and white, so the shading has to start around the bottom of the belly and
tone out towards the top of the back. The far back and front legs will be quite
dark and the neck under the head will also have a shadow.
The last thing to do is to give the sheep some shading. Our sheep is
clean and white, so the shading has to start around the bottom of the belly and
tone out towards the top of the back. The far back and front legs will be quite
dark and the neck under the head will also have a shadow. 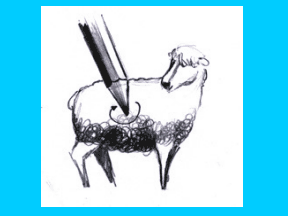
To simulate 'wool',
a circular motion with the pencil is used here.